Are you obsessed with shiplap?! I absolutely love the stuff! I am currently on a mission to add shiplap in every room of our home! Seriously, The texture, the farmhouse feel, all that white… how could you possibly beat it?! And I’m sure thats how everyone felt about the faux wood paneling in the 70’s, Lawd! Fortunately, shiplap is perfectly timeless! Some of you may actually have it hiding behind your current wall finish! We did, but it wasn’t salvageable. 🙁 bummer, but I knew exactly what to do!
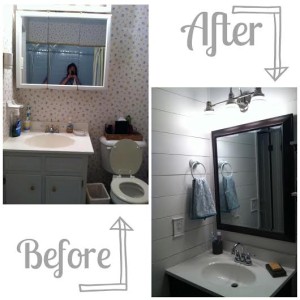
My love for shiplap actually predates Fixer Upper and the 5 million Pinterest pins. I used my version of super cheap shiplap nearly 4 years ago when I renovated my parent’s house! The picture above is their bathroom before and after! I also used this technique on walls in both their kitchen and living room. I actually starting using shiplap because I wanted an easy way to cover their old wallpaper! Several walls in their home had “accent wallpaper walls”…eeek… and I knew that I didn’t want to spend time stripping them or replacing the drywall. I decided to slap on a quick coat of paint and to cover the entire wall with strips of wood!
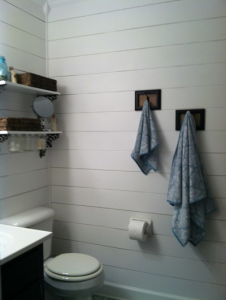
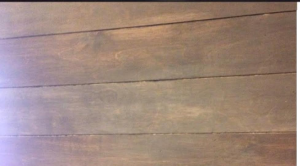
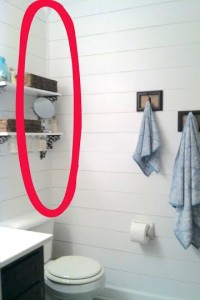
This picture is a closeup of a wall in our living room! In just our living room and kitchen we used shiplap behind our TV, around the opening to our sunroom/dining room, behind our coffee bar, above all of our cabinets and around the entry to our mudroom. Best part? All of that cost us around $50!!! HECK YESSSS!!! How did we do it?!
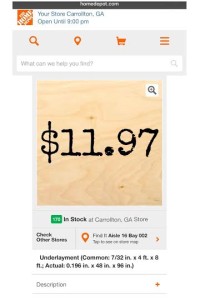
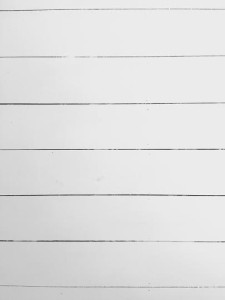
This is my secret weapon! It is called underlayment plywood and it only cost $11.97 for a 4ft x 8ft sheet! It is thin, but that makes it perfect for a one person project! I did all of our shiplap by myself! Also, the wood has a woodgrain pattern and it can be stained. My walls were stained before I decided to lighten them up with a bright white paint! This could be a cool finish in a boy’s room or a mancave!
I buy all of my wood from Home Depot! I love our local HD guys! I am constantly bringing them crazy projects and they are always willing to help! If you are near Carrollton, Ga you will not find a better place to get your wood for all of your DIY projects! Tell them Ally from Pin it sent you and I’m sure they’ll have plenty of stories to share!
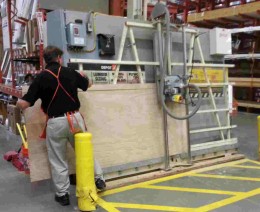
If you ask them really nicely, they will use this massive panel saw to make your life 1,000,000 times easier! I get my plywood ripped into 6 inch or 8 inch strips depending on how wide I want each piece to be on the wall. You can go as wide as you want! You could also rip the wood at home on a table saw!
If you opt for the boys in orange to do the ripping for you then half of your work is already done, but you will still need some type of saw at home to cut your strips to length! I personally use a compound miter saw like this.
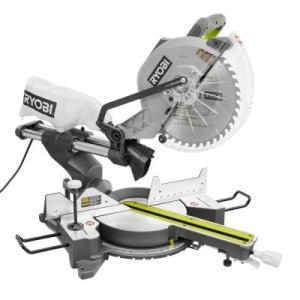
You could also use a jigsaw or a circular saw! I love using the miter saw because I can cut multiple pieces at a time and I can cut any angle with ease. Once you have measured your space, bought your sheets of underlayment plywood, ripped your sheets into strips and used a saw to cut them to length then you *MUST* sand over the edges! When the wood is cut it tends to fray and splinter around the edges. This step is crucial if you want a clean and smooth finished product. You can use a sanding block, sheets of sandpaper or an electric sander! I have used serval different methods of sanding and an electric or battery powered sander makes the job much quicker!
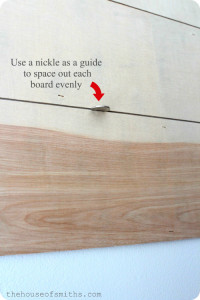
Now, you’re ready to attach the wood! Being a first time blogger, I forgot to snap a picture of this step, so I found one online! This is exactly how I space my planks! I get a pocket full of nickels, my trusty brad nailer and I go to town!
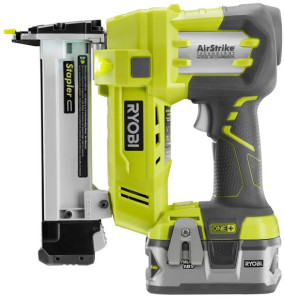
I’m kind of a Ryobi snob as you can tell! Their tools are perfect for every DIYer. Especially their line of battery powered tools. Moving on!
I always start from the bottom of my wall and work my way up! I measure, then mark my plank, I cut the board and finally I nail it to the wall. I try to keep my nail holes in line with each other all the way up. I move my nickels up as I go and I continue to measure each space. I do this because I know that my walls are not straight! Most homes do not have perfectly straight walls. I advise you to measure before every cut as well. Once you cover the wall and reach the top you will probably be left with a gap thinner than the width of a plank. Mark your board horizontally and rip it with a jigsaw, circular saw or a table saw! You can also hide a small enough gap with crown molding if you do not already have it at the top of your wall. Other types of molding can be used to hide imperfections in your installation.
I use quarter round trim to clean up the inside corners and I also use trim to cap outside corners. I think trim makes the project look professional, Especially when its caulked and painted the same color as the shiplap. In my case, white paint always wins! White shiplap will brighten your room and give it texture! I am in love with the shiplap in my home and I am more in love with the price tag!! Can I get an AMEN?! Now, go out into your own homes and put shiplap on anything that isn’t moving! You can do it!!
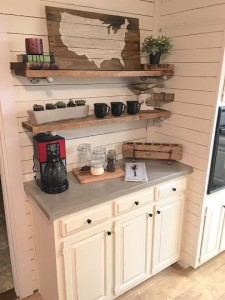
I’ll be over here on Rome Street enjoying my shiplap coffee bar!
Be a blessing today!
Ally